How the render target resolutions and the supersampling factors of Pimax and SteamVR work together

I have already expressed it in many replies, but since there are still new people coming in and being confused I decided to dedicate the thread to this topic.

First I need to point out that all numbers I will present later were:

  • recorded at Pimax 5k+
  • running, PiTool v1.0.1.91
  • and firmware v181

They should not change between the different versions, because they are basically defined by the optics, which does not change either, but its good to keep it in mind anyway.

How OpenVR (SteamVR) works

OpenVR subsystem (which is exposed as SteamVR app to the user) uses a headset driver (which is actually a DLL registered by the HMD manufacturer, here Pimax, with the OpenVR during the installation of the HMD software, here PiTool) to detect, initialize, query and use the headset.

The headset driver provides all the necessary characteristics (of the headset) so OpenVR could instruct the application, how it should render the scene. There are two important informations which the app needs:

  1. View geometry
  2. Image resolution

View geometry includes the view transformation and the projection matrices for each eye. Those basically define the position and the orientation of the eye/view (transformation matrix) and the single eye FOV (projection matrix).

Image resolution defines the quality of the image. The image resolution must have the precise aspect ratio which corresponds to the viewing frustum of the projection matrix. The one recommended by the headset driver is what the driver believes should give a balanced performance/visual quality.

While the first (view geometry) is defined by the hardware configuration and is either fixed (e.g. the position of the lenses) or configurable (e.g. the IPD), the second (image resolution) is basically easily modifiable by the user, as long as the modification respects the aspect ratio requirement.

Baseline (a.k.a. the HMD recommended render target resolution)

The HMD recommended render target resolution is typically not directly exposed to the user though it is not difficult to figure out - because it is what is shown in SteamVR video setting if you set the supersampling manual override to 100%. You can also find it written into the log file vrcompositor.txt at the very beginning when SteamVR starts.

While this value is fixed for example for OG Vive, it is not fixed for Pimax. In particular it depends on:

  1. Pimax model (5k+ vs 8k)
  2. PiTool Rendering Quality setting
  3. PiTool Parallel projection setting
  4. PiTool FOV setting

For the Pimax I am going to define the baseline recommended render target resolution when PiTool rendering quality is set to 1.0 and the parallel projection is off.

Here is the table how the resolution differs for different FOVs and parallel projection config (Pimax 5k+, PiTool rendering quality at 1.0).

FOV      PP off        PP on
Small    2638 x 2633   2787 x 3291
Normal   3202 x 2633   3852 x 3291
Large    4267 x 2633   6949 x 3291

We can see that the change from the parallel projection off to on is different in vertical and horizontal dimensions for different FOVs. This is because of how parallel projection works and is explained elsewhere (All the parallel FOVs of Pimax 5k+).

I have seen people asking, how is it possible that those resolutions do not relate to the physical panel resolution.

There is no direct relation between the physical panel resolution and the recommended render target resolution

Why is that?

1. Pre-lens warp transformation

First, the headset requires higher resolution image than the panel res, because it must warp the image before it is shown on the panels and the pre-lens warp transformation needs more pixels in order to not lose precision.

It kind of works like a supersampling, except that the warp is not linear (as it must compensate for pincushion distortion of the lenses by adding barrel distortion to the image) so there is no linear scaling of the image.

This explains why there is no favorite factor for supersampling, because the non-linear aspect of the warp basically applies different supersampling factors to the different part of the image.

2. Different FOV configuration

Since Pimax offers different FOV configuration, it cannot use the full horizontal resolution of the panel for each, because the optics is fixed. So if the largest FOV maxes the panel out, the smaller FOVs can use only the proportional res.

3. Hardware IPD setting

While the lenses move when adjusting the hardware IPD, the panels don’t. So in order to accommodate the full IPD range the headset must reserve enough space at the both ends of the panel to allow the repositioning of the image according to the IPD settings.

Here is an example of the image rendered at the baseline resolution (PP off, PiTool 1.0, Normal FOV) by the app (Beat Saber):

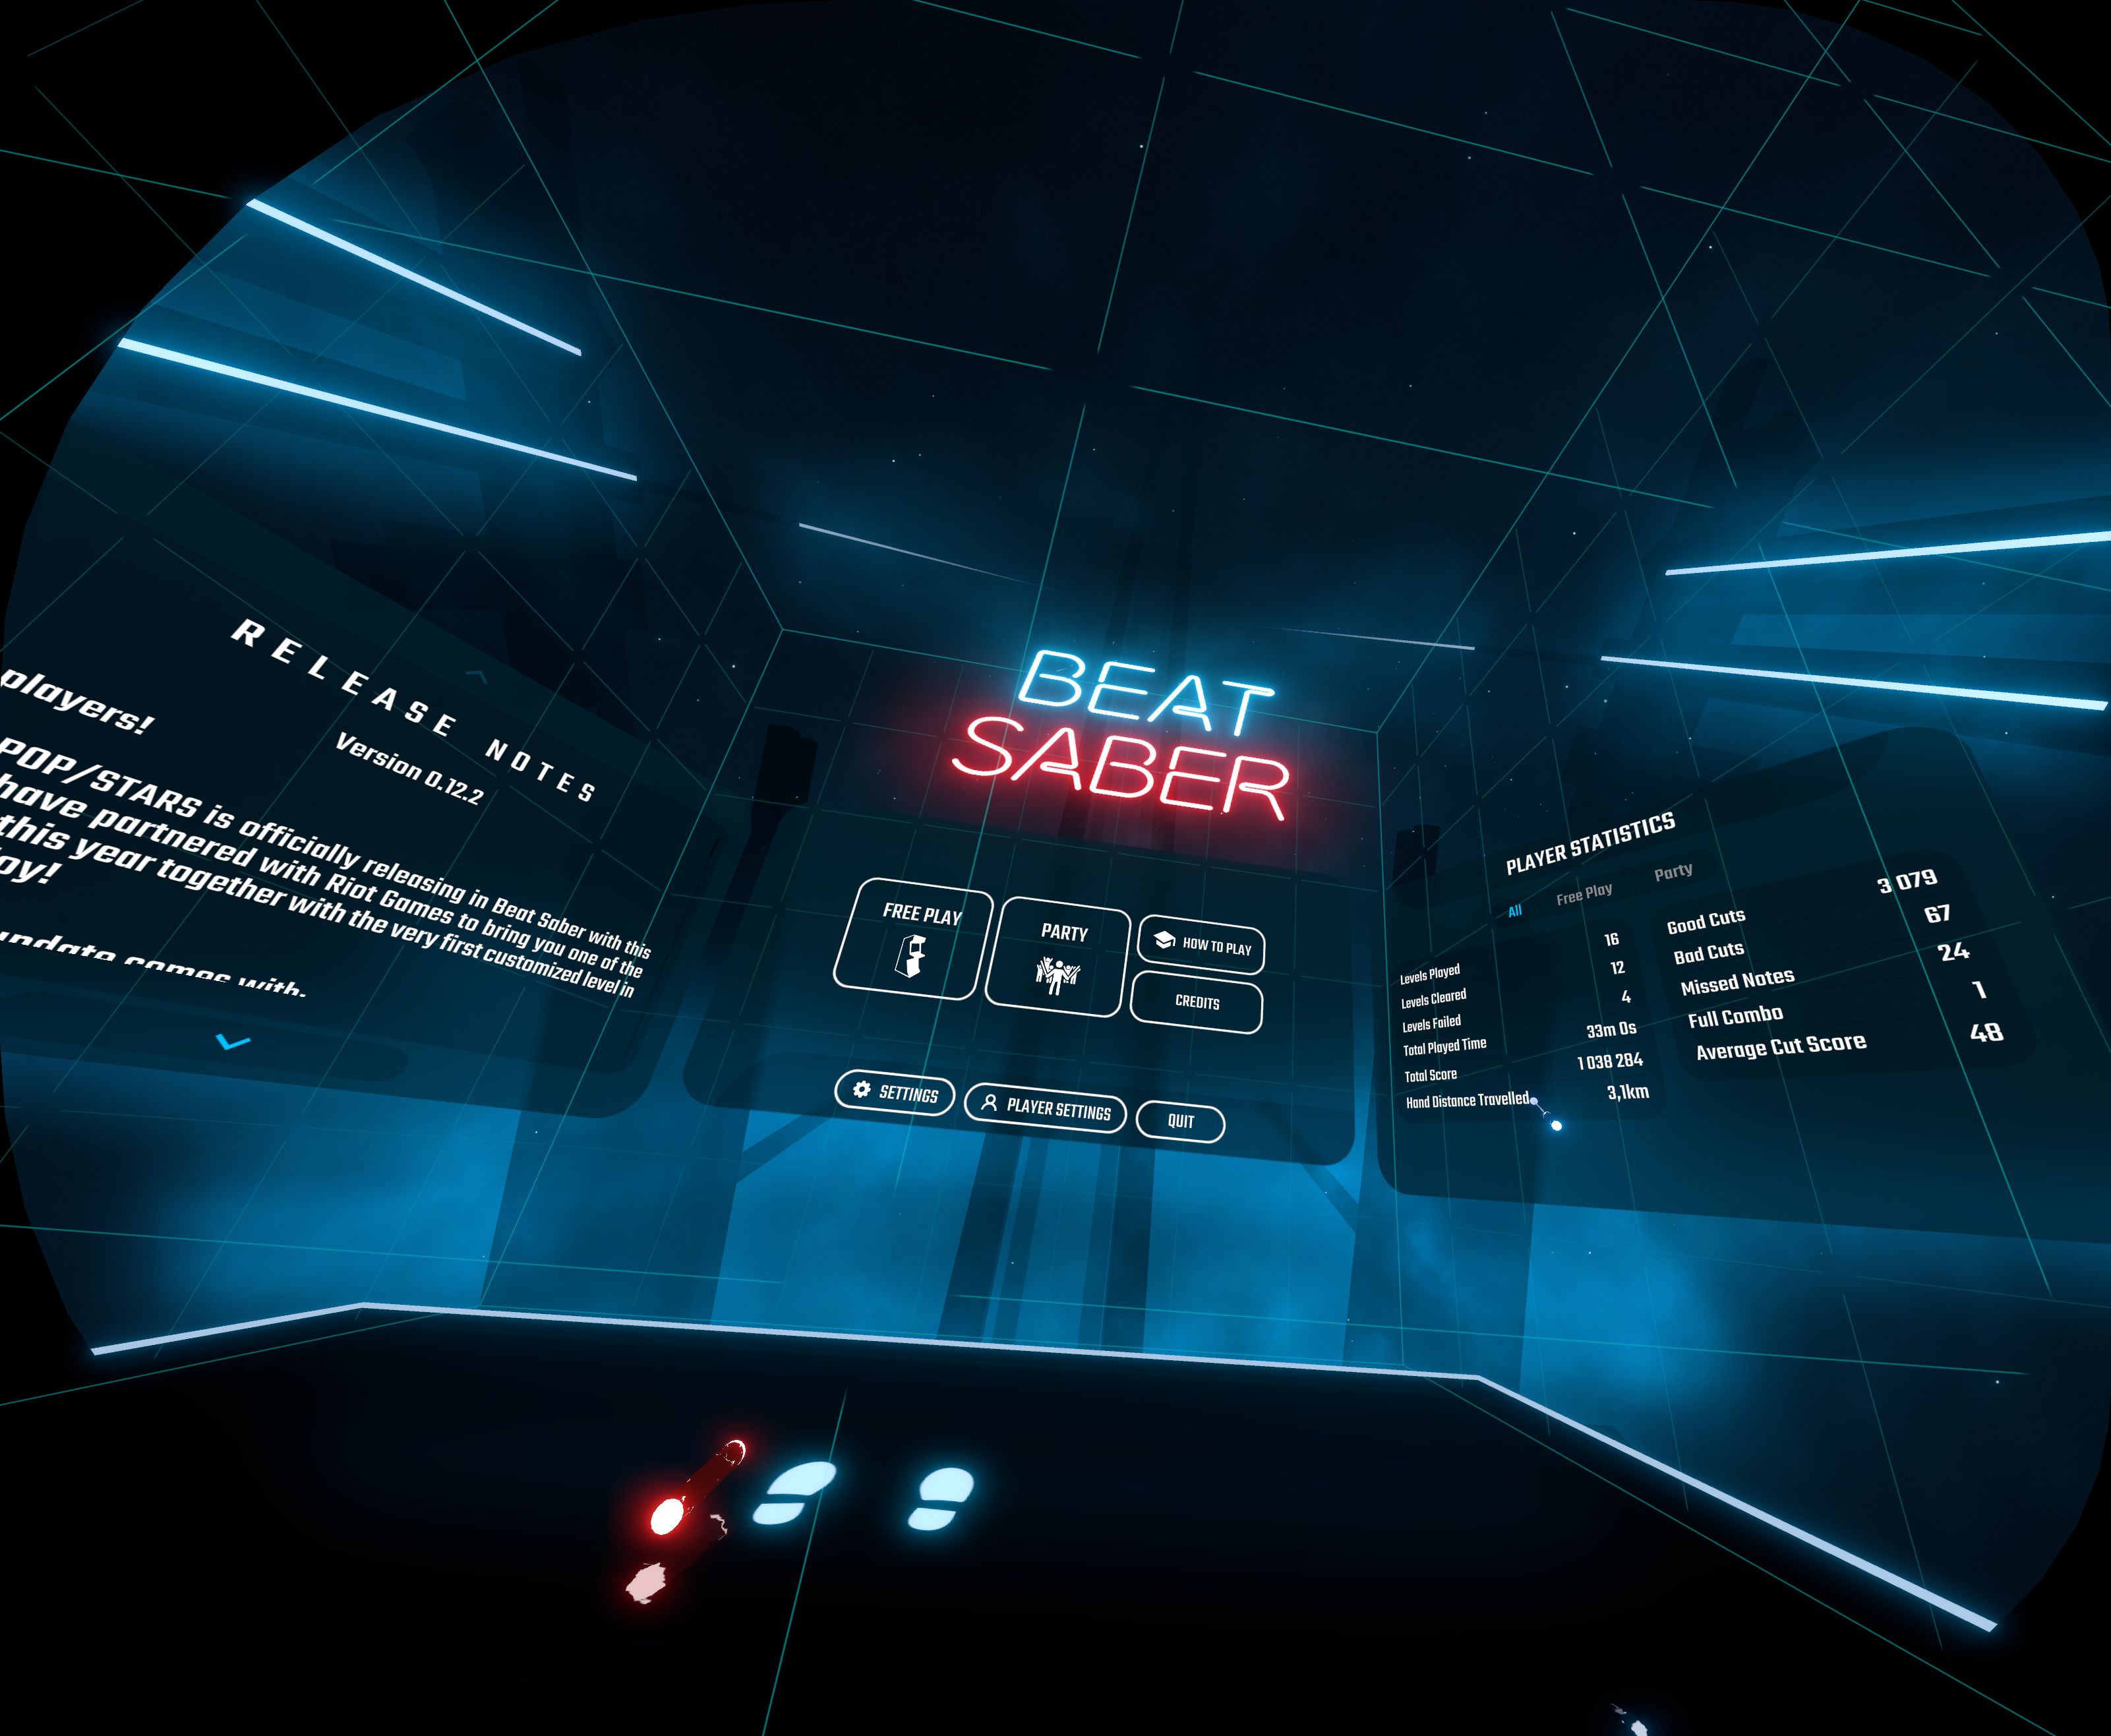
You can notice that the resolution of the image is 3202x2633 which confirms the value in the table above and that the used part (where the game image is rendered) fills fully both the horizontal and the vertical resolutions (except the black areas in the corners, which are explicitly avoided by the renderer as instructed by the headset driver by supplying the hidden area mask). In other words, the renderer, being given the resolution, could not be more efficient.

Here is, how this picture looks after the pre-lens warp transformation is applied:

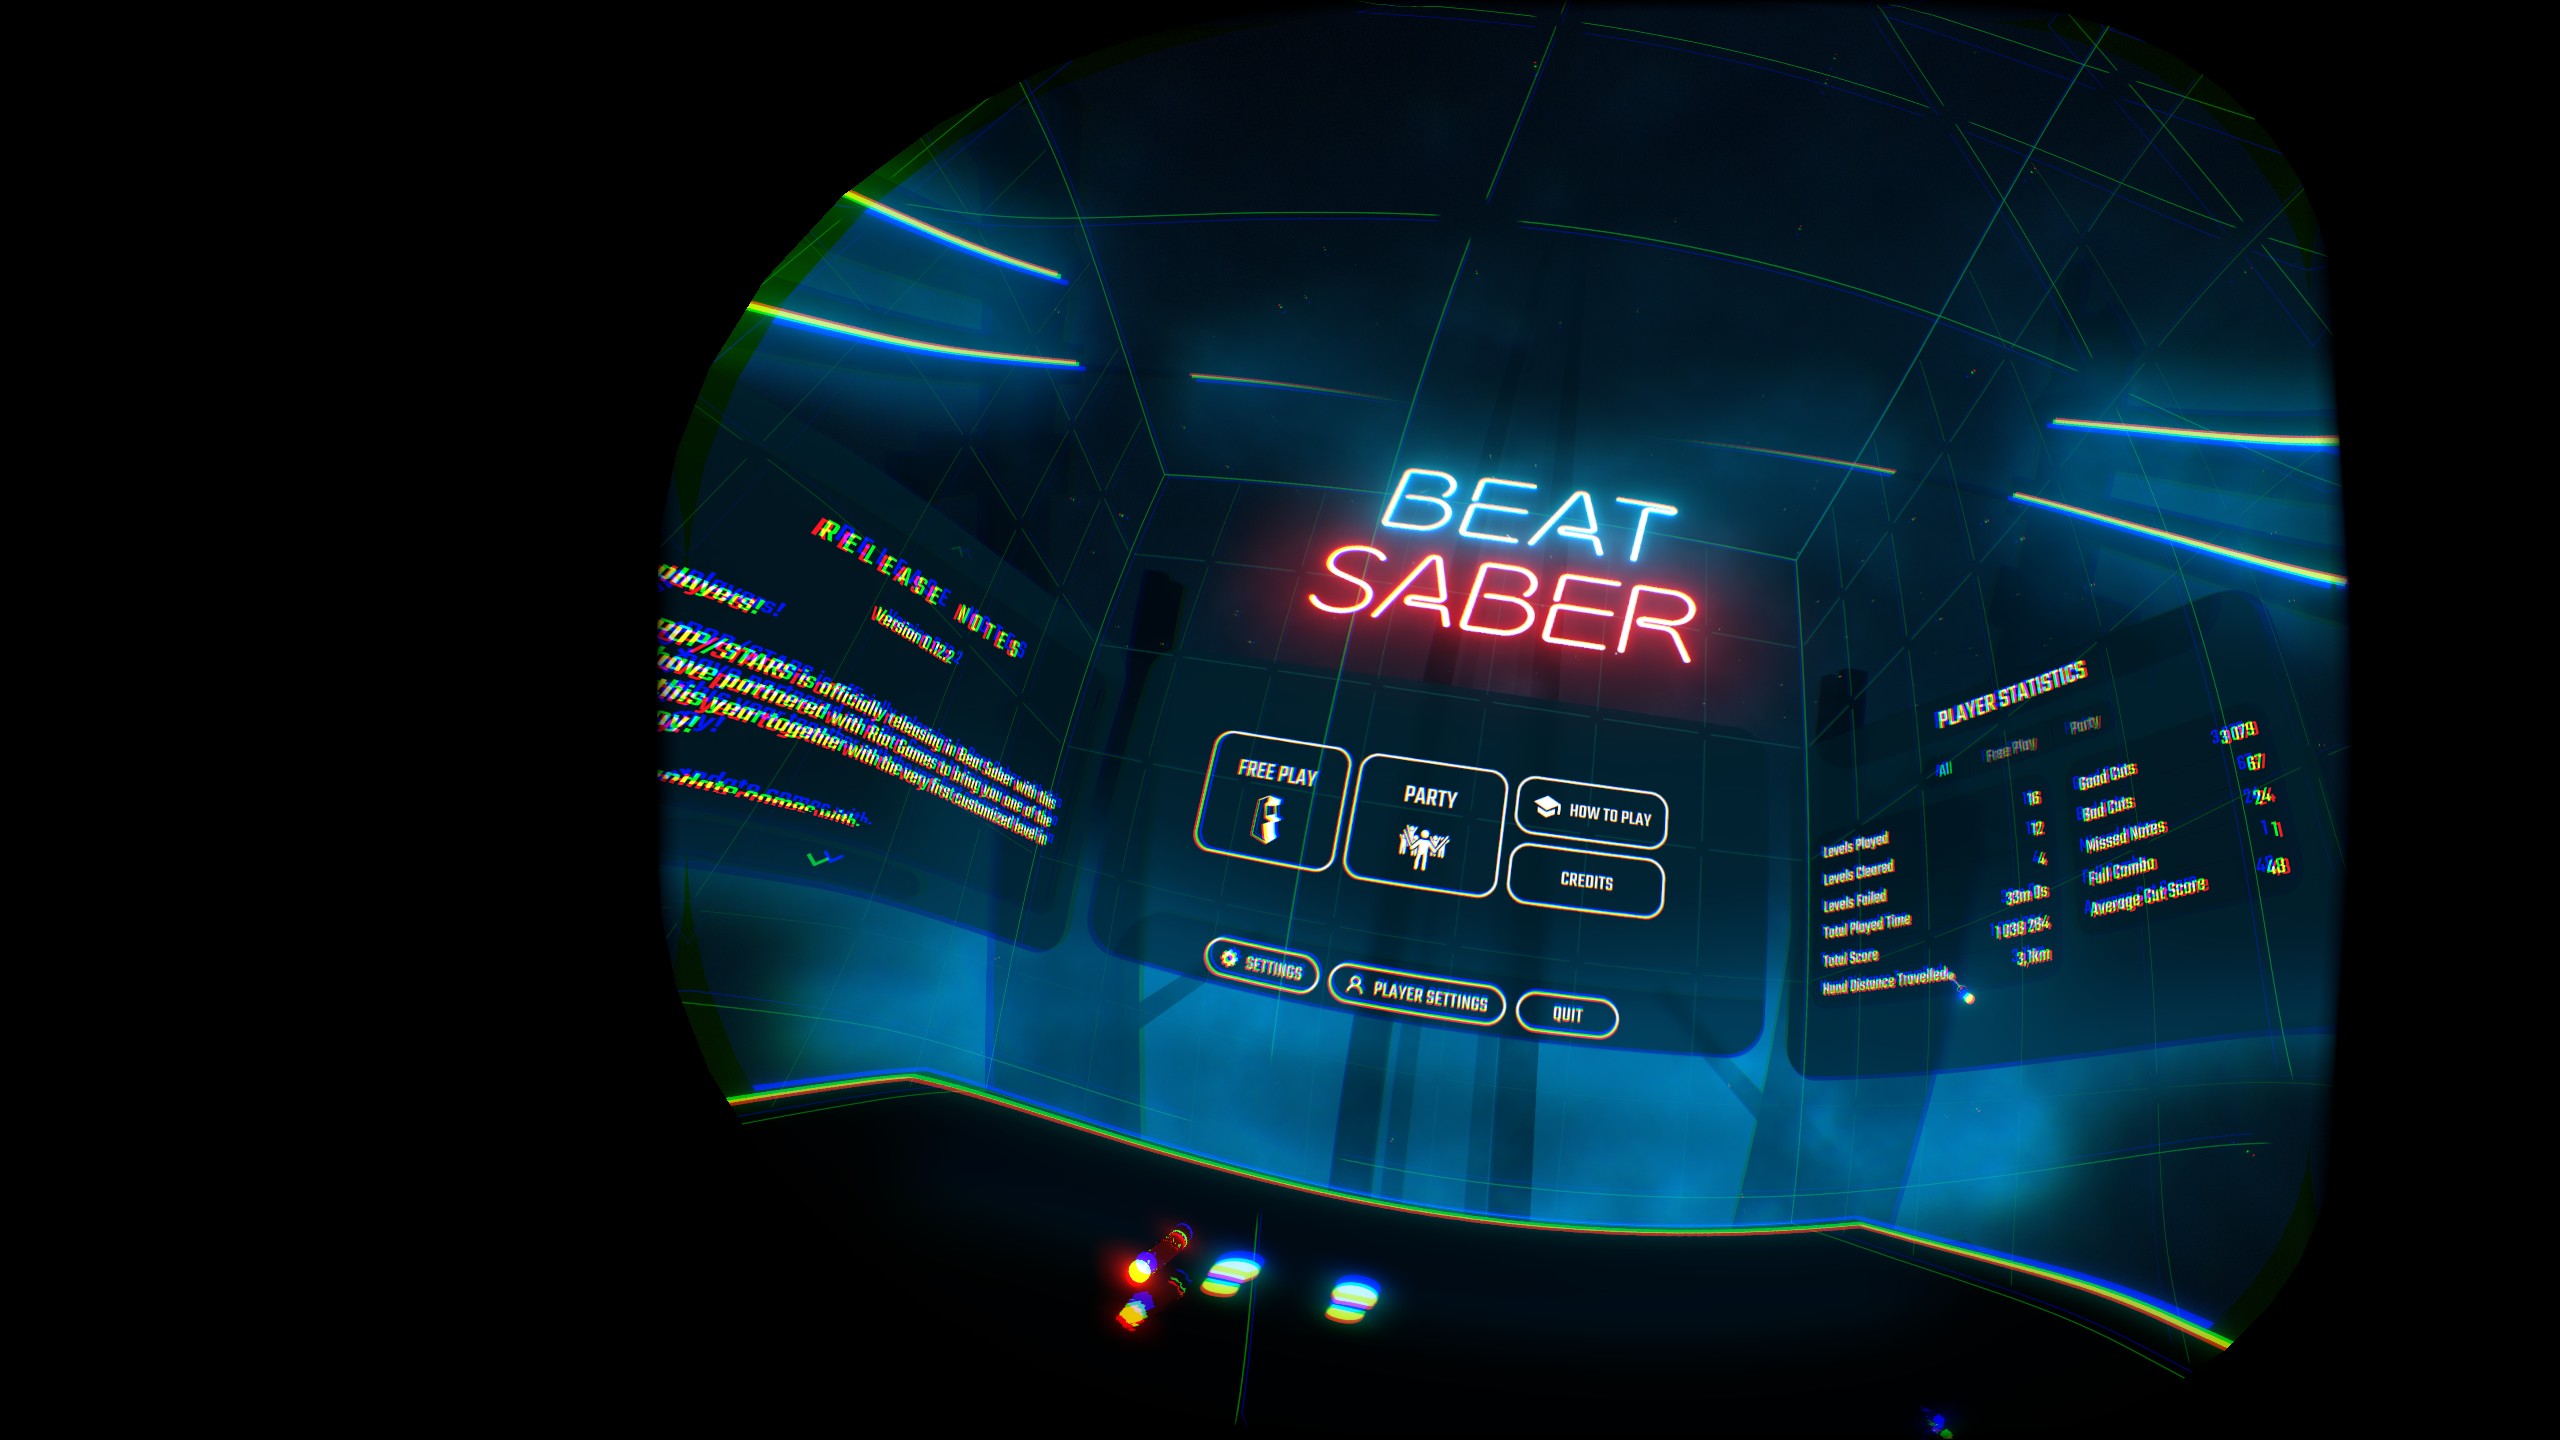
You may notice that the image is indeed distorted with the barrel distortion. (Better illustration of the barrel distortion is here Pimax native projection and pre-lens warp transformation).

What is appalling are the large black areas on the left and right, because these are actually unused. The left area is caused by using reduced (Normal) FOV, the right area is related to my hardware IPD setting (~70 mm) and is close to the limit the headset can handle. Lesser IPD will move the image closer to the right side.

The Important thing to point out here is that while there is a lot of unused pixels, they are not wasting the GPU performance, because the app is never rendering there. The only exception is the chaperon grid, which is rendered as an overlay by OpenVR and apparently does not respect the hidden area mask. But for what the app rendering concerns the optimization is pretty good.

How the user can change the baseline resolution and how the different supersampling factors combine?

PiTool Rendering Quality

First change is possible in PiTool, by changing the Rendering Quality. The formula which applies here is factor by the dimensions. I.e.:

Let (X, Y) be the baseline res, reported by the headset (when PiTool RQ is at 1.0)
Let RQ be the new rendering quality set in PiTool
The new resolution is (RQ*X, RQ*Y).
The new pixel count is RQ^2*X*Y.

This is important to keep in mind, because the SteamVR supersampling factors work differently (factors the total pixel count, instead of the image dimensions).

SteamVR global SS factor

Let (X, Y) be the baseline res, reported by the headset (PiTool RQ at 1.0)
Let S be the SteamVR supersampling factor
The new resolution is (sqrt(S)*X, sqrt(S)*Y)
The new pixel count is S*X*Y

Which means that SteamVR SS factor can counter PiTool RQ factor, and it does, when using automatic SS adjusting in SteamVR!

If you let SteamVR to auto adjust the SS factor for you it will basically run a benchmark and then adjust the SS so that the total pixel count ensures that the rendering time remains below 11 ms (~90 Hz for Pimax 5k+).

In other words, if you increase PiTool RQ (and do not change your GPU), SteamVR will decrease the SS correspondingly by 1/(RQ^2).

SteamVR application specific SS factor

Apart from the global SS setting in SteamVR, there is also an application specific setting, which is just “personalized” version for the individual app. For each app (which is recognized by SteamVR) the final SS factor is a simple multiplication of the two:

Let SS_g be SteamVR global supersampling factor
Let SS_a be application specific supersampling factor
The applied SS factor will be: SS = SS_g * SS_a

Let (X, Y) be the baseline resolution (recommended by the headset).
The new resolution recommended to the app by OpenVR is:
(sqrt(SS_g)*sqrt(SS_a)*X, sqrt(SS_g)*sqrt(SS_a)*Y)

The new pixel count recommended to the app: SS_g*SS_a*X*Y

Total formula

Combining all the information from above we can determine what will be the recommended render target resolution (pixel count) to the app by OpenVR:

Let (X, Y) be the baseline res, reported by the headset (when PiTool RQ is at 1.0)
Let RQ be the new rendering quality set in PiTool
Let SS_g be SteamVR global supersampling factor
Let SS_a be application specific supersampling factor

The new recommended render target resolution to the app by OpenVR is:
(sqrt(SS_g)*sqrt(SS_a)*RQ*X, sqrt(SS_g)*sqrt(SS_a)*RQ*Y)

The new pixel count will be: RQ^2*SS_g*SS_a*X*Y


Do not forget though that the recommended render target resolution to the app by OpenVR is just that - recommended - and the app is free to choose a different one (Recommended render target resolution is just that - recommended).

41 Likes

Thanks for putting this together! A couple of questions:

  • Are there any benefits of using PiTools for supersampling vs steamVR since both work in conjunction to define the final pixel count?
  • Have you looked into the Xtal and how they’re able to keep a 1:1 ratio for lens resolution and display resolution?
3 Likes

Technically no.

But there are people who believe that it is better to max PiTool and squeeze SteamVR, because @PimaxUSA once said that PiTool “does more” (and never explained what exactly).

Since PiTool (Pimax compositor, to be precise) cannot do anything about the image quality it receives from the app, because the app renders the image to specified res and does not care how this res was calculated, it can do only as much - as the pre-lens warp - and there is not much more one can do about it.

I was nevertheless curious what PiTool could do more by running it through Nvidia debugger, but did not notice anything that would suggest that. Neither by comparing the quality of the output image (https://community.openmr.ai/t/is-it-best-to-fix-pitool-at-a-certain-resolution-like-1-75-or-2-0-and-change-steamvr-ss-or-the-opposite-or-are-they-interchangeable/14897/28), nor by checking the resources in the pipeline.

So my conclusion was it was very unlikely.

I have not seen Xtal, nor am I particularly familiar with its design, but the only way to achieve 1:1 ratio is theoretically by completely eliminating the pincushion distortion of the lenses over the whole FOV, because the oversampling necessary for the current (consumer) headsets is just the band-aid for the pre-lens warp (which applies the inverse, i.e. the barrel distortion, to the image) to not lose the image information/precision.

My knowledge of the optics is limited, but I would assume that if Xtal uses such lenses, they have to be much more sophisticated than the “simple” lenses used in the consumer headsets. Probably a sandwich design, I do not know.

10 Likes

My guess is the complicated lenses are a decent contributor to the $3000+ price tag.

Also, I recall hearing that the original Pimax 8K lenses (pre-Kickstarter) were somewhat higher quality/price and that they had to do a redesign to bring costs down. Not 100% on that though.

2 Likes

Without a doubt.

The lens are the secret.

1 Like

My knowledge is also limited but afaik such lenses are not possible without introducing other distortions. It is always compromise what is more important (choose your poison). Even eyepieces costing $1000 are not distortion free.

1 Like

XTAL is definitely not doing what I am about to suggest, but it is probably also theoretically possible to get a 1:1 ratio using a 100% raytraced scene.

You could apply the necessary destortions when you generate the initial ray set so that you start with one ray per visible pixel that has been bent to account for the lense distortion.

Though the rendering hardware isn’t there yet.

I could also be completely wrong, so open to being corrected.

Edit: Great post by the way. It was a good read.

2 Likes

Thanks for the awesome, informative post!

1 Like

Good post. I came to the conclusion that it was best to leave SteamVR at 100% for both Video and App and just use PiTool Render setting for render resolutions.

Easy and Pimax know what they are doing.:grinning:

The thing is that apps need individual adjustment due to their specific computational profiles. What you suggest doesn’t account for that.

Thank you for the concise and helpful info. I assume that pitool not only changes the render target resolution but also the compositor resolution = ingame steamvr dashboard. I prefer to set this value low in order to spare GPU power because it is constantly rendering during running game (otherwise you wouldn’t get an image at once when pressing sys button).
Surely this will blur the compositor image but I don’t care for that because the in game graphic quality can be enhanced further.

I think the rendering hardware is there, even Pascal cards should be able to do it, given that they are capable of some limited raytracing.
The algorithm I have in mind would be a modified version of the deferred rendering method that’s already popular in many titles and engines:

  1. Cast rays to the scene and retain coordinates of intersection, normal and other data needed by the fragment shader
  2. Render a flat rectangle over the view which executes the fragment shader.

Note that this isn’t really ray-tracing, as it doesn’t handles shadows, refraction… It’s merely a modification of an existing technique, that only changes the first step.
I don’t really have a good feeling for the number of ray/object intersection tests are realistic with existing hardware, but I have good hopes it could be feasible, especially considering the resolution you need to target is regular 1440p for the PiMax.

2 Likes

In that case, maybe best results are to then adjust from good base setting from SteamVR App and as a factor of 2 so 50%, 100%, 200%

Maintaining relative resolution to initial PiTool render target. Just a thought.

Maybe I misunderstood what @robertr1 meant by 1:1 ratio. Did you mean that the image resolution is equal to the panel resolution, or that the image pixels are 1:1 mapped to the panel pixels. I replied to the latter, but it looks like maybe you meant the former. Also, do you have a reference to this information?

Concerning the raytracing, it would solve the need of the pre-lens warp (and probably many others “hacks” on the 3D rendering pipeline), but whether it will be faster I am not sure, considering how fast the current RT tech is compared to the “classical” rasterization. I believe though that this is the way to go.

4 Likes

By 1:1 I meant that the output pixels were mapped 1:1 to the panel pixels.

I don’t have a reference to anything mentioning this particular application of ray tracing, so it is just speculation. It seems that it should be theoretically possible.

Both ray tracing and “traditional” rendering are based on the idea of a viewpoint and a view plane. In traditional rendering the 3D objects are re-projected onto the plane. In ray tracing there is a ray for every pixel which represents the inverse of the path that light would take when passing through the plane on the way to the view point.

I found a picture on wikipedia:

In the case of the VR headset, there is a lens between the viewpoint and the plane which will distort what the eye sees. The different pixels will be perceived to be in different places, however we want the plane to appear as if it is not distorted. As you mentioned above we need to apply the inverse of the distortion. In the “traditional” rendering the original rendered plane is re-rendered onto another plane as you mentioned above.

With ray tracing we could modify the original rays based on the distortion profile so that the traced ray is the ray that will be perceived to correct the distortion. The easiest example would be a lens that distorted the image so that it was flipped over. The ray that would be perceived on the bottom of the image would actually be a ray that intersected the top of the plane, so for the top pixels we would trace rays going through the bottom of the plane.

In theory it seems to work (Though I could be wrong), but in practice the question would be how easy it would be to compute the perceived rays. This wouldn’t need to be done every frame though if you assume a static view point.

3 Likes

That is an interesting idea. If you are going to use it to skip the additional warp step, you would need to figure out what to do about transparent objects. I saw multiple articles with different ways to handle transparent objects with deferred shading. Some of them rely on using “Forward Rendering” (Which is normal non-deferred rendering) to render the transparent objects, which wouldn’t work here because you would need to apply the lens deformation to them.

Yeah, the main question would be whether or not it would be faster to render like this at a lower resolution without the extra warp step or if it is faster to do normal rendering at a higher resolution and then apply the warp step.

As this doesn’t bring any of the other benefits of a 100% ray-traced scene, as you mentioned (ex. shadows), then the only reason to go this route would be improved performance, so if it wasn’t faster then there would be any point.

Also, any sort of ray-tracing would require the game engine to implement the rendering pipeline. It could be abstracted so that the headset provides the initial ray set, however it isn’t “Plug-and-Play” like the current system where it takes the output of whatever rendering pipeline the game has and then applies an additional warp.

3 Likes

One guy did a raytracing proof of concept, back for the Oculus Rift DK1.

He did cast his rays with the geometric distortion caused by the lenses in mind, rendering a counter-distorted image right away, and eliminating the need to do it as a post effect, but he did not take this concept the whole way, effectively distributing rays evenly per degree of field of view (which would have been rather efficient, doing away with unnecessary oversampling where least needed (EDIT: one could, on the contrary, begin to go the opposite direction, and reduce the sampling density in the periphery, where our retinas are rather sparsely populated anyway – would take some filling in the blanks (pixels) in post, mind)), instead of per pixel, but he did make a version where he rendered in two passes, with a round central area at full resolution, and everything outside at half (“fixed foveated rendering” if you like).

Raytracing is computing heavy, but does allow for several potential optimisation techniques that are not possible with rasterisation. :slight_smile:

(EDIT2: E.g: I rather enjoy the speculative notion of one day altogether doing away with the paradigm of video frames, and writing (EDIT3: …and seeing right away - each pixel on the display would act individually, with its own persistence duty cycle) every individual pixel directly to the display (in a predictable pseudo-montecarlo sort of pattern, to avoid having to waste bandwidth on addressing), the instant it has finished rendering.)

4 Likes

I would like to follow your directions! where did you download these

This was yet another interpretation I did not figure out :slight_smile:, but my questions were for @robertr1 who brought this into the thread originally. Apart from that, I agree with you, the raytracing is supposed to do exactly that.

1 Like

I do not know if it is a good idea to go for this old version of the PiTool. I keep it simply because I am happy about it and do not like some problems reported with the newer versions, but for what concerns the information in my original post, I assume that they apply equally to the newer version(s), as they are depending more on the hardware than on the software.

But if you really want to try, I believe there is a link somewhere on the forum, might be difficult to find though. Just beware that the firmware version v181 is coming from the PiTool v1.0.1.95, which I installed originally, and then downgraded to v1.0.1.91. The firmware from the newer PiTool version remained as it was compatible with the older PiTool too.