Reserved Table of Contents
With images: https://www.reddit.com/r/ValveIndex/comments/j6yny0/how_to_use_steamvr/
I made this guide to help people feel more comfortable and reduce friction in VR. It’s also supposed to make you fully acquainted with SteamVR settings, how to use things like Desktop view so you don’t have to take off your headset, how to get into VR quickly, and some addons you should use. Always look for ways to do the things you want to do in VR or can’t do right now. There’s a tool called Aardvark that some community people and a valve person or two are trying to get going, that could make being inside VR a lot less clunky by creating a really great way to make apps and gadgets that run over VR/AR and can communicate between users and each other, basically a whole app economy would become possible.
Make sure you have powercycling on so the base stations turn on and off with the headset. You can set up base stations either at waist level just sitting on tables (2.0 only), on tall camera stands, or on the wall. If they are ever moved they do need to do room set up again. If you set them up on the wall you probably can just unplug the cord on both ends and take it out again when you need it.
Your PC’s startup can be quick and easy if you boot your OS off an SSD and turn off password login in windows. You can add a headless monitor plug if you want to move your computer around without a monitor or TV so that you still have desktop view.
The way I use VR is that I walk into the room, I press the power button on my PC (monitor left off), I walk over to my Index and click the button on the bottom (this turns on steamVR as long as Steam is running), put it on, and I’m in VR. I turn on 3D passthrough (double-click the button on the headset) to pick up my controllers, then turn passthrough off after I launch a game. I turned SteamVR Home off and you should too (see below).
SteamVR starts when you press the system button on your headset, as long as steam is open. You can also just right click the steam icon in the icon bar or pin SteamVR to the taskbar. For opening games, I either use the dashboard, which isn’t ideal because it only shows your recently played games, or I use icons on my PC desktop/the desktop steam interface.
Steam Big Picture mode is always accessible in VR. Click your library button on the dashboard and then “browse all” to see your whole Steam library, and click back to the Big Picture home to use things like Steam Chat and invite people/join their games.
The Tutorial is a little portal themed tutorial Valve originally made for the Vive. Resetting Seated Position is for when you want to sit somewhere other than the room center and the game doesn’t have a setting for that. Display VR view brings up the VR mirror of steamVR, which includes things like overlays running on top of the game and your passthrough (if you’re a streamer you can use it to show your room to your audience easily) (if you’re showing someone VR then turn this on because it will show you exactly what they see including any bugs or if they open the dashboard), and if you select the “both eyes” mode it works better than any generic in game one but there is a slight performance cost. Devices is where you can pair controllers and power-manage your base stations so they turn on and off with your headset. It also lets you restart SteamVR, even from inside the HMD. Workshop is mostly for SteamVR home environments. Settings is what we’re focused on here.
Do this on the desktop to make it easier for you. On the little steamVR box click the three lines and then “settings” to open the settings UI. Do it right now while you read the guide if you want, your headset should be idle and not rendering if you’re not wearing it.
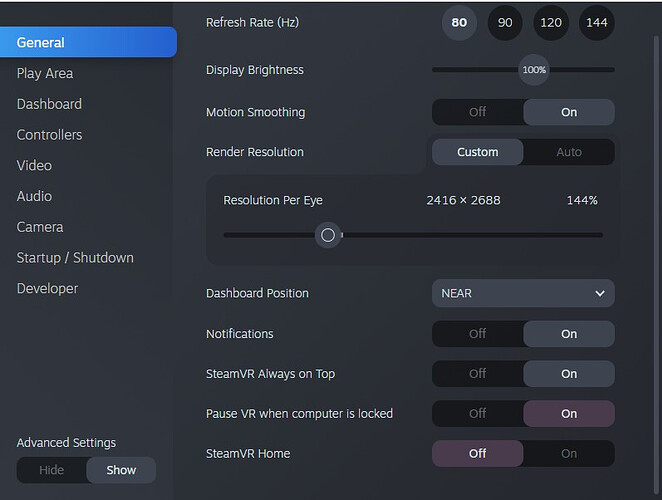
Turn on advanced settings in the left corner. Then take a look at what’s in the general settings. Refresh rate, brightness, render resolution, etc are obvious. Click from “auto” to “custom” on the resolution if you don’t want it to change the resolution when you change frame rate. Notifications means you can turn in-headset steam notifications on and off.
At the bottom there is an option for SteamVR Home. If you don’t use it I would definitely turn it off s ince I don’t like running a graphically intensive outdated program when I’m not doing anything.
Next click on play area. I use a medium grid or squares chaperone, and I set the color to white. I also have a low activation distance but set yours at the right distance for what you need. I remove the play area floor by making it invisible since it isn’t necessary and doesn’t cover the whole floor anyway. Choose the white background if you hate glare. Toggle on the floor bounds if you always want to always be able to see where your boundaries end while you’re playing, useful if you want to use roomscale movement as much as possible.
Next click on dashboard in the menu list. I would set “show desktop tab” to “off” if you’re going to use an app like desktop+ to replace your desktop view. Each option reduces what a user inside the headset can do, which is useful for when you’re showing the headset to someone and don’t want them to get confused, including making the system button do nothing so they don’t accidentally activate it. You’ll still be able to go into your SteamVR settings on the desktop and change it back. Dashboard position does what it says, so bring it closer if you can’t see clearly or further away if you want more room to use the laser pointer.
I address the controller bindings topic at the end.
In the video menu there are a lot of the same options as the general tab. Make sure “fade to grid on app hang” is on, and at the button where it says “pause VR while headset is idle” you may want to make sure that is on. Overlay render quality shouldn’t really matter, the dashboard uses almost no resources. You can change your refresh rate during gameplay in every game except Half Life Alyx, which requires a restart. You can change resolution while a game is running but some may require you to restart it.
Render resolution basically works by either being set to “auto,” where SteamVR picks a resolution based on your refresh rate and GPU and “custom,” where you choose the value. If you want to keep your resolution when you change your refresh rate, keep it on custom. I play Pistol Whip at 144hz with the same 144% super sampling I use at 90hz in games. Having something like fpsVR makes it really easy to tell what settings work for you.
The bar that says “per application video settings’’ is very useful. What this does is allow you to add a resolution modifier for a specific game that is always applied to that game (whatever your default resolution is, times the modifier), and you can change the “motion smoothing” setting. Here’s an example of that in action: In Pavlov matches with 40-50 people, both the CPU and GPU frametimes tank and fluctuate a lot. So what I do is that I set my index to 120hz, and then I turn motion smoothing to “force always on.” That means the game only tries to render 60 frames and fake frames fill in the rest. There’s artifacting but it’s smooth. In games that are CPU bound this is also important since you can’t just lower the resolution and fix it. During a game you can click “video settings” on the dashboard and and it’ll bring up these settings too.
Turning off motion smoothing just changes how reprojection works. Motion smoothing is when it switches to running at half framerate and fills in the other half, where the old reprojection method was only replacing the frames you were missing, and only compensating for head rotation, which could look choppier.
In the audio menu you can change your input and output devices. This could be useful if you want to use RTX voice (uses GPU power to eliminate any background noise), since it appears as a separate microphone. You can mirror audio if you’re showing a game off to people, and you can turn on output from both the speakers and something plugged into the 3.5mm audio hack. I recommend you install EarTrumpet , a windows app that makes it quick and easy to adjust the volume of different apps separately without extra menus.
For cameras, turn on 3D room view. Then room view has a few options from clear ghosts to opaque passthrough, I use opaque passthrough to just see the world but you can make it less obvious. The reason you would do that is that “show camera at room edge” makes the passthrough come on when you step close to the boundaries. This is good for showing it off to new people but is a little slow, so you might want to go back to dashboard and adjust how close you need to be to trigger the walls.
If you have Natural Locomotion installed, it breaks your camera, just so you know.
Startup is important. You can change which apps steamVR starts up with. You don’t have to have revive enabled here to actually use revive, it just turns off the library button. You can also stop other apps like Desktop+, metachromium, and fpsVR from starting with steamVR at launch if you want.
The only “developer” tab setting you might want is to enable “show GPU performance” for a few minutes because it shows a graph on your face of your GPU frametimes, making it easy to see how your setting decisions affect performance. But fpsVR works better for this.
This is a leaner, better version of the SteamVR desktop mirror. It also adds a keyboard that lets you do things like click “control” or “shift” and then another key so you can copy and paste even when you can’t right click.
You can pin windows in your playspace or relative to your hand, and keep using and clicking on them when the dashboard is closed, plus you can spawn a keyboard to use still inside your game.
One particularly useful feature is that it adds a task switcher which you can just click to tab out of the game you’re in. Lots of games load fullscreen and basically block you from doing anything else at the same time. Windows 10 now lets you not just tab out, but make a whole separate desktop by pressing WIN+TAB, this lets you have a game full screen but your monitor just sees your desktop and anything new you do. This is what Desktop+ uses for its window switcher and it’s great. This makes it easy to use discord, look something up, go on twitter during downtime, etc. It’s useful to not feel as limited in VR.
FPSVR
This has a lot of settings (and likely inspired some of Valve’s improvements to SteamVR after the index came out). Of note are a few things.
This is the biggest one, you can
OVR Advanced Settings
This enables a lot of niche functions and tweaks. It’s free on github and Steam. If you have accessibility/mobility concerns I recommend looking into it. They have a discord, so head there if you need it for those reason and they’ll probably help you out.
When you use an overlay like Desktop+ or fpsVR to add the ability to tab out of the VR game’s desktop window, you can do most of the things you need to do. Opening discord, a browser, even watch youtube videos, whatever, probably isn’t going to affect your performance unless the game is really CPU bound.
If you want a second or third monitor in VR, you need to buy a headless monitor, because of how Windows works. It’s just a cheap dummy monitor plug that tells windows it’s a 4K 60hz monitor or whatever. Desktop+ and a few other programs like Virtual Desktop let you use them at the same time.
For what it’s worth, I always turn on the passthrough when I use the desktop view, it feels more comfortable and always runs underneath the dashboard or overlays.
This is helpful for when a game just can’t hit framerate and seems to move up and down. Like MS Flight Simulator or some pavlov custom servers with a lot of people. You can set your refresh rate higher, or leave it, and then force on motion smoothing. It keeps your framerate smooth rather than bouncing around.
This whole system is glitchy and sometimes just doesn’t work, and some games don’t support it at all so you have to literally map one button to another rather than a specific function. But it also allows you a lot of control. Like you can make something actuate faster by changing how much the trigger or grab needs to be held down before it actuates. But I also cannot make a full guide to how this system works because I actually don’t understand every function it has.
Two uses I found for example, were changing mag release in some games to pressing down on the thumbpad, or in H3 I run whenever my off hand is squeezing down. It’s a useful system. TTS is one game that benefited from completely redoing the controls myself in this system. If a game doesn’t use the thumbpad, I recommend taking a look at what you can rebind it to do; the thumbpad can work as one button, two buttons, or four buttons.
You can change the field of view, which squeezes the same number of pixels into less space for a more dense image. This can cause some culling issues (objects popping in and out)
Reshade is a tool using AMD tech that slightly sharpens the image and improves the colors with little to no performance cost. I recommend using it, especially on an LCD headset. You can press the END key to toggle it on and off without taking off the headset. You copy the files in the reshade download and paste them next the game’s exe.
Here’s a running list of games that work.
AMD FidelityFX Super Resolution
This lets you render a game at a lower resolution and it upsamples back to normal, to save on the GPU load. You can also use foveated rendering on some games, I recommend using this app to make enabling it and disabling it easy.
Holoswitch
Holoswitch is an app that lets you bring android notifications into VR. It also lets you watch a camera feed inside VR from an external camera.
The most interesting feature to me is that you can take videos inside of VR. It adds a watch on your hand that appears when you look at it that lets you start recording. It also captures the overlay layer, including desktop mirrors, the dashboard, and passthrough. This is much easier than using the steamVR mirror to get everything. It does hurt performance a little when you’re recording.
Stop Sign VR
This app was made to let you trace over an object to make a box that stops you from walking into it. Like internal boundaries in your space with a lot of options. They also added a few other features like another room boundary system, audio cues, fade in boxes, and you can actually have one of these boxes show the fpsVR performance monitor and turn to face you.
If you’re on WMR, you should get this since it will give you a much better room boundaries system.
Pluto
Pluto is basically Facetime in VR. You can call someone and they’ll appear as a roomscale avatar in your playspace on top of whatever game you have running or your passthrough. You don’t see each other’s game’s but you can talk to each other without having some whole dedicated app just to talk to them. They’re working on tools that would let you do things like draw together, share screens, etc too. The reviews on steam are negative because it used to be hard to turn off if it was set to start with steam. Those issues seem to be resolved and uninstalling it is the same as anything else on steam.
Metachromium
Metachromium is a WebXR browser that lets you run WebXR on top of VR games, or on top of passthrough. Some examples you could check out are: Plockle, a Cubism style puzzle game that’s easy to play on top of other games (disable the background from its menu). VARTISTE, a painting app that lets you paint on canvas or 3D models. MoonRider, a Beat Saber clone made by the community that has all the community maps. Basically any WebXR app where you can turn off the background or that doesn’t have one.
Reality Mixer
Reality Mixer lets you trace a real life object and see it in your game. You could trace your mouse and keyboard to make them easier to use with an HMD on. You can mark your door or couch to see other people while you play. Or an object you want to avoid in your play space.
The Frunk
-
You can use a gamepad or anything else USB by plugging it into the headset. I would assume this also lowers latency, so for seated VR it can be nice, or when playing a VR game standing with a gamepad/VorpX in VR.
-
Sometimes I play TTS with only one controller, so it works really well if I have my controller plugged into the headset and charging. You might be able to get an adapter to charge both. Valve doesn’t recommend doing this if you’re whipping your arms around so you don’t damage the usb-c port.
-
Attachments like a leap motion with a little USB-C to A adapter fits inside easily. Some people have used it to hold fans or dedicated fan attachments, even a keypad, or to store candy.
The Vive has a free USB slot on top as well, where the strap connects to the headset and all the cables attach. I used to plug my leap motion in there.
I really hope I can remake this guide in six months or a year and also talk about new features Valve adds, or Aardvark gadgets that remove clunk and friction/add functions to SteamVR.
Link to Source Below
Other Useful Aps.
