If you use the Pitool IPD setting, you click on IPD Offset on PiTool and then use keyboard. Try to press left and right arrow at minimum and maximum IPD, then you will see that the line is divide to be 2 lines, after that you move slower when the line stay at the center and stop when it become 1 line. You need to move left and right a lot of time to make your brain remember the last image and then you can find the real center.
If you are focusing on the center of image, try to look at the bottom instead and you will see that the line will be curve line and have space between 2 lines, so make it to be 1 line.
You can look at other position, try to look at number 10 or 11, when your left eye look at the 10, you will see some glow around the number because the inner edge of the left lens. But if you use your right eye to look the number 10, you will see normal number. Then make the left 10 (glow) to overlap with right 10.
I can use this step to calibrate both of software, hardware.
The different between software and hardware is
When I use the hardware IPD, I think the the position of lens at low fov not make the different result, only black ring at the center may be different when you look at the closed object. When I adjust the lenses from 59-67 the results are same (my IPD is 66) . But if you move the lenses at fov which more than your fov, you will see that the image not correct.
p.s. I suggest that you should measure your IPD and measure the distance between center of the lense and use that distance (the distance between center of both lenses may not be the same value which be show on HMD).
p.s. 2 Before adjust by hardware, set the IPD in Pitool to be 0 before.
When I use the software IPD, when you use too less or too much IPD value, you can see that the image will not have correct overlapping by the both direction.
Note : When I try to change default image without quit Pitool and shut down HMD, I found that the bg become white sometimes or it show image only one display (left or right), or display is black or cache the old image.
This test is about my eye without wearing the HMD (but the result will be same when you wear the HMD).
I found that when I turn right and try to look the text on the monitor at the left, it has same height of 2 images (left and right eyes, good overlapping of images).
But when I turn left and try to look the text at the right, it has different height.
When I try to close one eye to watch any image, the image of left eye is higher than the image of right eye.
May this make me to get the issue of looking image at the right edge and it can’t be overlap perfectly. So I can focus best at the center. this issue is better when I rotate the headset (make right side to be higher than left side), but not comfortable. I notice this problem since I try to use MagiMask AR cardboard, if the display is too closed, I can’t make the subtitle in video to be overlap at the same horizontal angle. It can make eye strain to me.
I need to make
pimax_default_left.jpg
pimax_default_right.jpg
If there are these 2 images in the folder, it will load this image in each eyes.
If PiTool can do that, I will try to make different image and make arrow in each eyes to check the correct the position.
At first, I have ever try to make 3 lines with the different style or colour, if you have correct position, it will be 1 line and correct colour, but I think if I make arrow in each image, it will easier to check.
If we try to watch the finger in front of us, try to close each eyes and look the position of finger, you will see that the left eyes will see the image which stay at right more than the right eyes.
But this setting must be relate to the game rendering too.
Make radio menu to switch between Pitool home or IPD calibration.
Or anyone can make steamvr plugin and it will be better if we can calibrate IPD while playing the game because may we change player while playing the game.
I don’t think IPD value on HMD is work well, only useful for remember the value. But very confuse while I change the IPD on Pitool and I have to set to 0 everytime when I will adjust IPD hardware. Or please show more value by seperate the 2 values (IPD by wheel and IPD by Pitool), it will be better when adjust 2 values.
In other words the static image is rendered (at least according to my observation) as if it was at infinity, while the eyes would naturally seek it at the finite distance (the focal distance). Adjusting the soft IPD may mitigate it by changing the eyes’ convergence, but the question is if it would have an impact on the standard 3D rendering. This would depend on whether the static image problem comes from the wrong calibration, or just the wrong implementation of the static image rendering.
Besides that, you cannot verify that the 3D geometry is rendered correctly only with the static image and it may actually suffer, if you set the IPD wrong with the static image, because you won’t be able to detect it.
So the recommendation as usual is: Make sure you know what you are doing
Hi, I was not on the forum since I needed my 5k+ to return and waited for a replacement over 3 months. The new one arrived yesterday and I have the feeling that my IPD is slightly off.
I tried to use your instructions with the new offset value in Pitool but I don’t really understand what to do. Perhaps my english is not good enough. Where do I start? I first set the hardware IPD and then I look at this image and try to make it into one line? How do I get this image into VR?
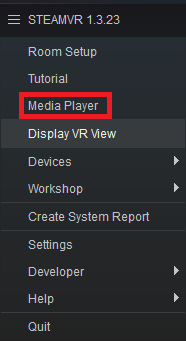
By accident I’ve found a method that is accessible to everyone. SteamVR media player can be used to view stereoscopic images.
With the media player replacement of pimax_default.jpg isn’t necessary anymore, the only limitation seems to be that the viewing distance from the image cannot be adjusted but zoom could be good enough to compensate.(viewing distance can be adjusted, added screenshot)
When SW IPD is too low focusing on close objects is difficult but focusing on objects far away gets easier.
The reverse is the case for too high SW IPD.
3D Test Image requiring SBS
Switch between focusing on the baseballs and the guy, adjust SW IPD accordingly
Just an FYI to the OP and in case anyone else has this problem. I saved the image and tried it and it didn’t work (just gray screen). I looked at the original default and noticed it was 96 dpi vs the 100 of yours. Changed yours to 96 and all is good.
EDIT: Sorry, forgot to say thanks, I think this really helped.