https://github.com/finallyfunctional/Simple-OpenVR-Driver-Tutorial
1 Like
If anyone is interested, we are working on openvr driver so that anyone can assemble this arduino based locomotion system and use it in steamvr without any need to wire the vr controllers


It is going to take some weeks. Hopefully at some point i will be able to share the whole project with a step by step guide and maybe other people would decide to help out with code improvements?
5 Likes

Thanks Alex of finallyfunctional !
1 Like
We have done progress with the openvr driver. We created a dedicate openvr driver for this locomotion system that allow the use of the locomotion system in steamvr.
We can wirelessly connect the arduino/teensy locomotion system to the pc and we can
-
emulate a gamepad in Microsoft Windows
-
control vr controllers via openvr driver , without the need of any wiring between the arduino and the vr controllers. Practically anyone can use this arduino locomotion system in steamvr, to control the vr controllers for locomotion (including jump and crouch).
ps: I have opened a hackaday page that I hope to update with step by step instructions.
This locomotion system (for who like tinkering) can still work by directly hacking controllers to directly control for example valve knuckles, quest 1 and quest 2 controllers, ps4/ps5/xbox controllers, without going through any PC/software.
2 Likes
So is this just a walking in place system or is it going to be actual walking simulation?
1 Like
Walk in place and walk accross the room.
Also it uses chest to move in any directions the joystick at analog speed.
If you look at the video, i show
-
the use of chest for moving the joystick in any direction at analog speed
-
walk and running in place at analog speed
-
cruise control at analog speed by bending the left or right foot
-
pressing sensors that can be used for backwards and lateral movements at analog speed (chest sensor can achieve the same lateral and backwards movements at analog speed)
-
not shown in the video, but we can still use room scale /walk accross the room and move at analog speed accroos the room
Works similarly to katloco or walkovr or a treadmill.
I think this DIY system has a mixing of functionalities that are present in the 3 systems above. Also can be customized and expanded and it is open source since anyone could fine tune the software, add more sensors etc.
I am hoping to look into maybe how to create some sort of diy omnidirectional flooring system.
https://www.mw.tum.de/en/am/research/completed-projects/cyberwalk/
Also 1 next goal is to add a button that when pressed allows to ignore the sensors . So practically the sensors of the locomotion system would be isolated and we can use the vr systems (our headsets) without the sensors that we wear being triggered. This could be useful for in game fast actions where maybe any add-on sensor of this locomotion system could just be in the way of a smooth gameplay.
1 Like
Just for the tinkering people.
Just had the ps5 gamepad wired so that the above locomotion system can be connected to it and control the gampead.
I have already tested it and it works 


3 Likes
This is the schematic of the teensy based locomotion system
It consists of
- 2 accelerometers for the feet (1 at each foot)
- 1 accelerometer for the chest
- 4 pressing sensors at the feet (2 for each foot)
- 2 flexing sensors to wear at the knees (1 at each knee)
- bluetooth module for wireless communication to PC for steamvr /openvr injection
Bluetooth connectivity on PC for PC-teensy communication
-USB-UART
-Bluetooth module


This is instead the custom gamepad (xinput) based on a teensy 3.2 , with integrated the locomotion system based on the teensy 4.0
- Wired communication between the teensy 4.0 and the teensy 3.2
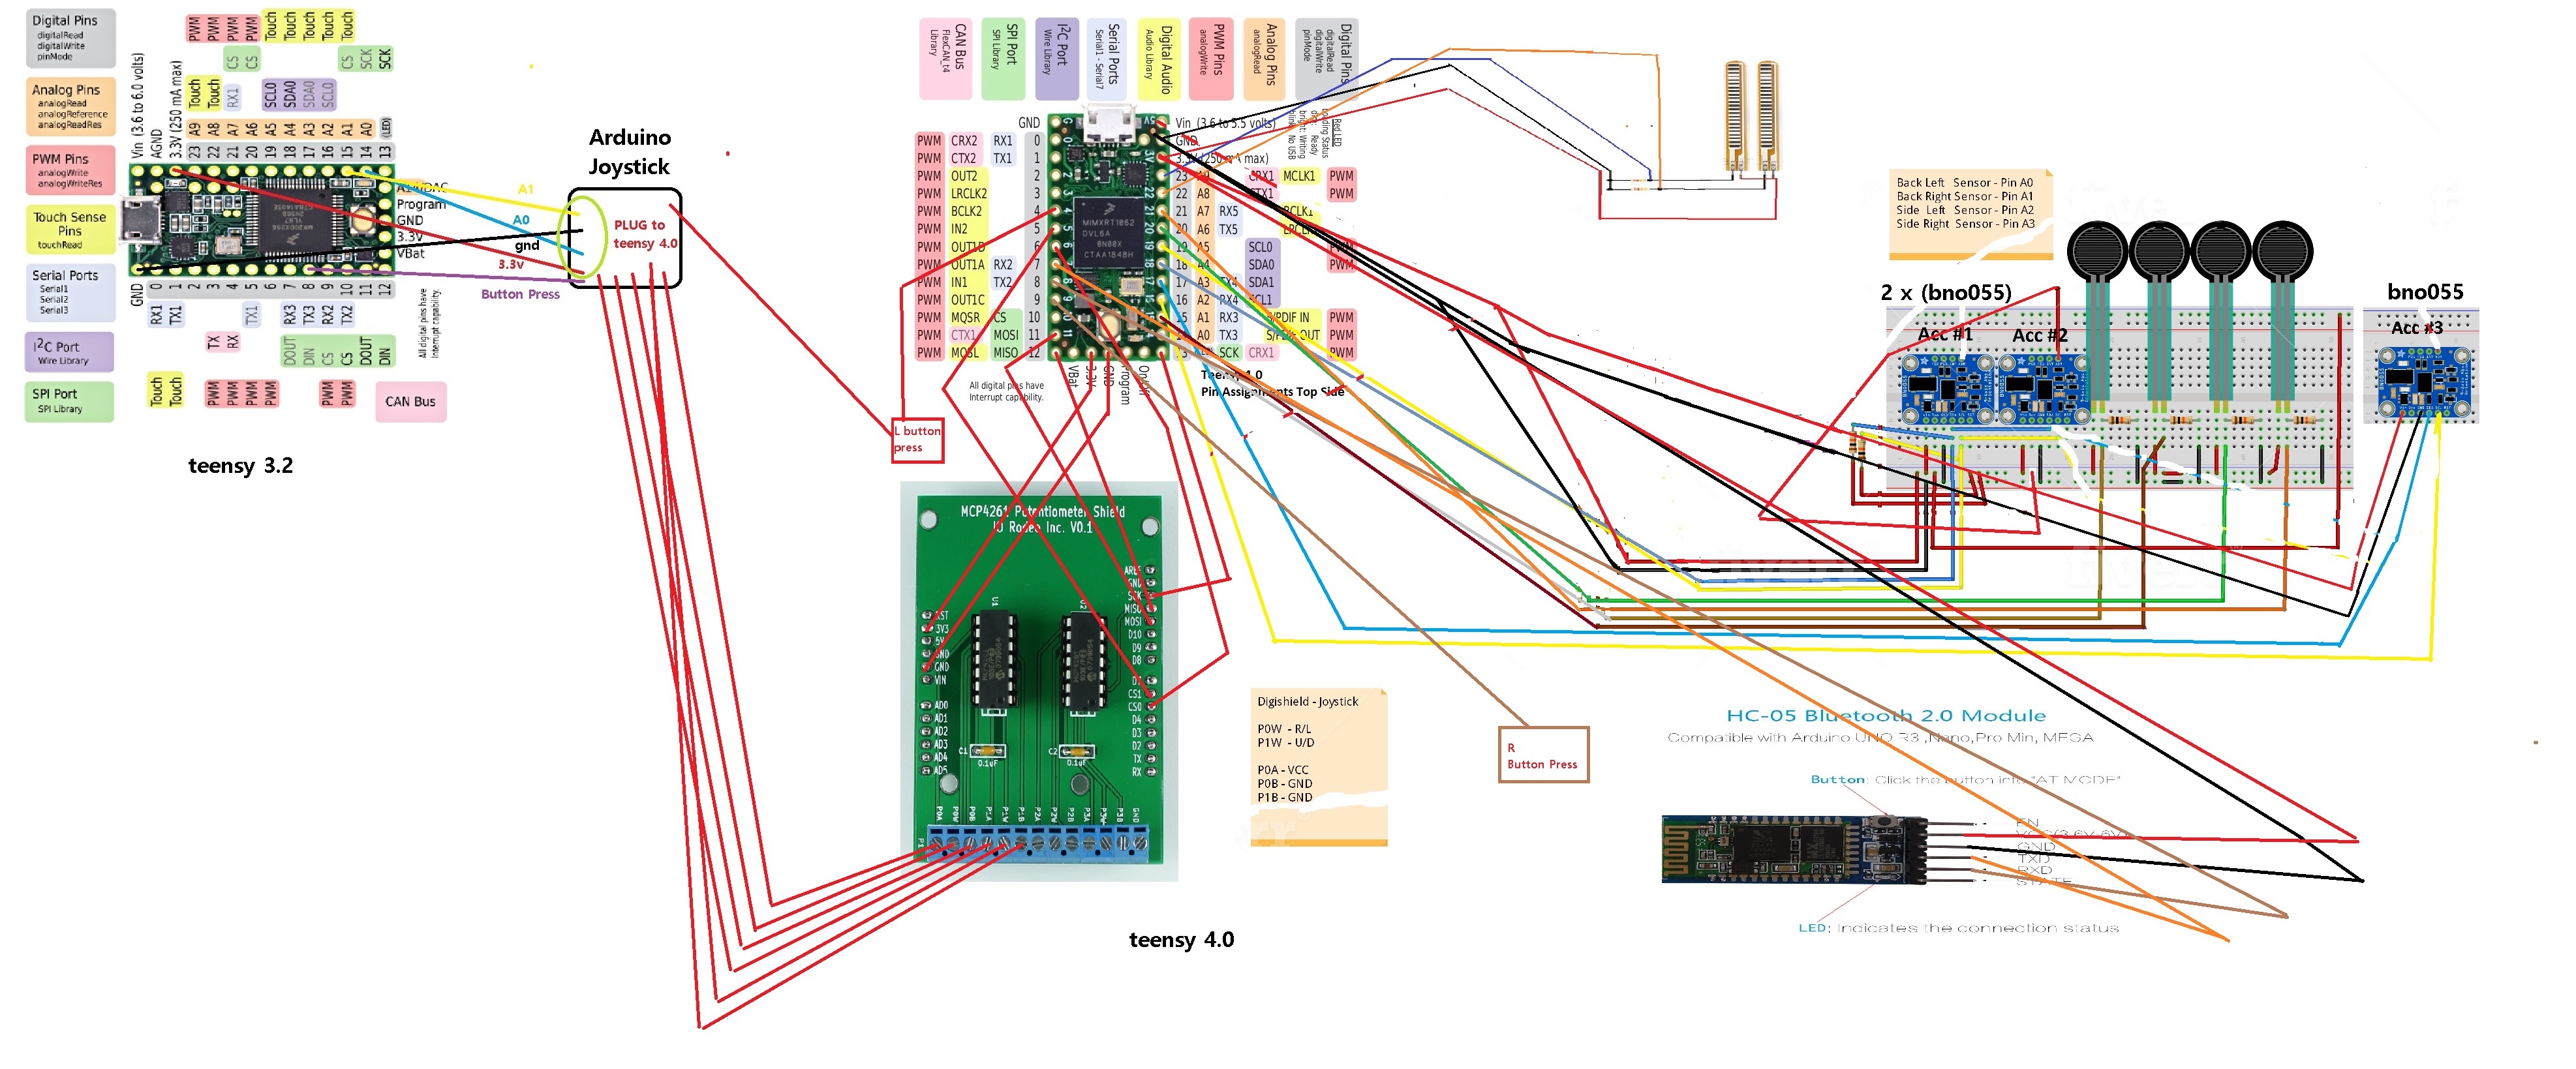
- wireless communication between the teensy 4.0 and the teensy 3.2
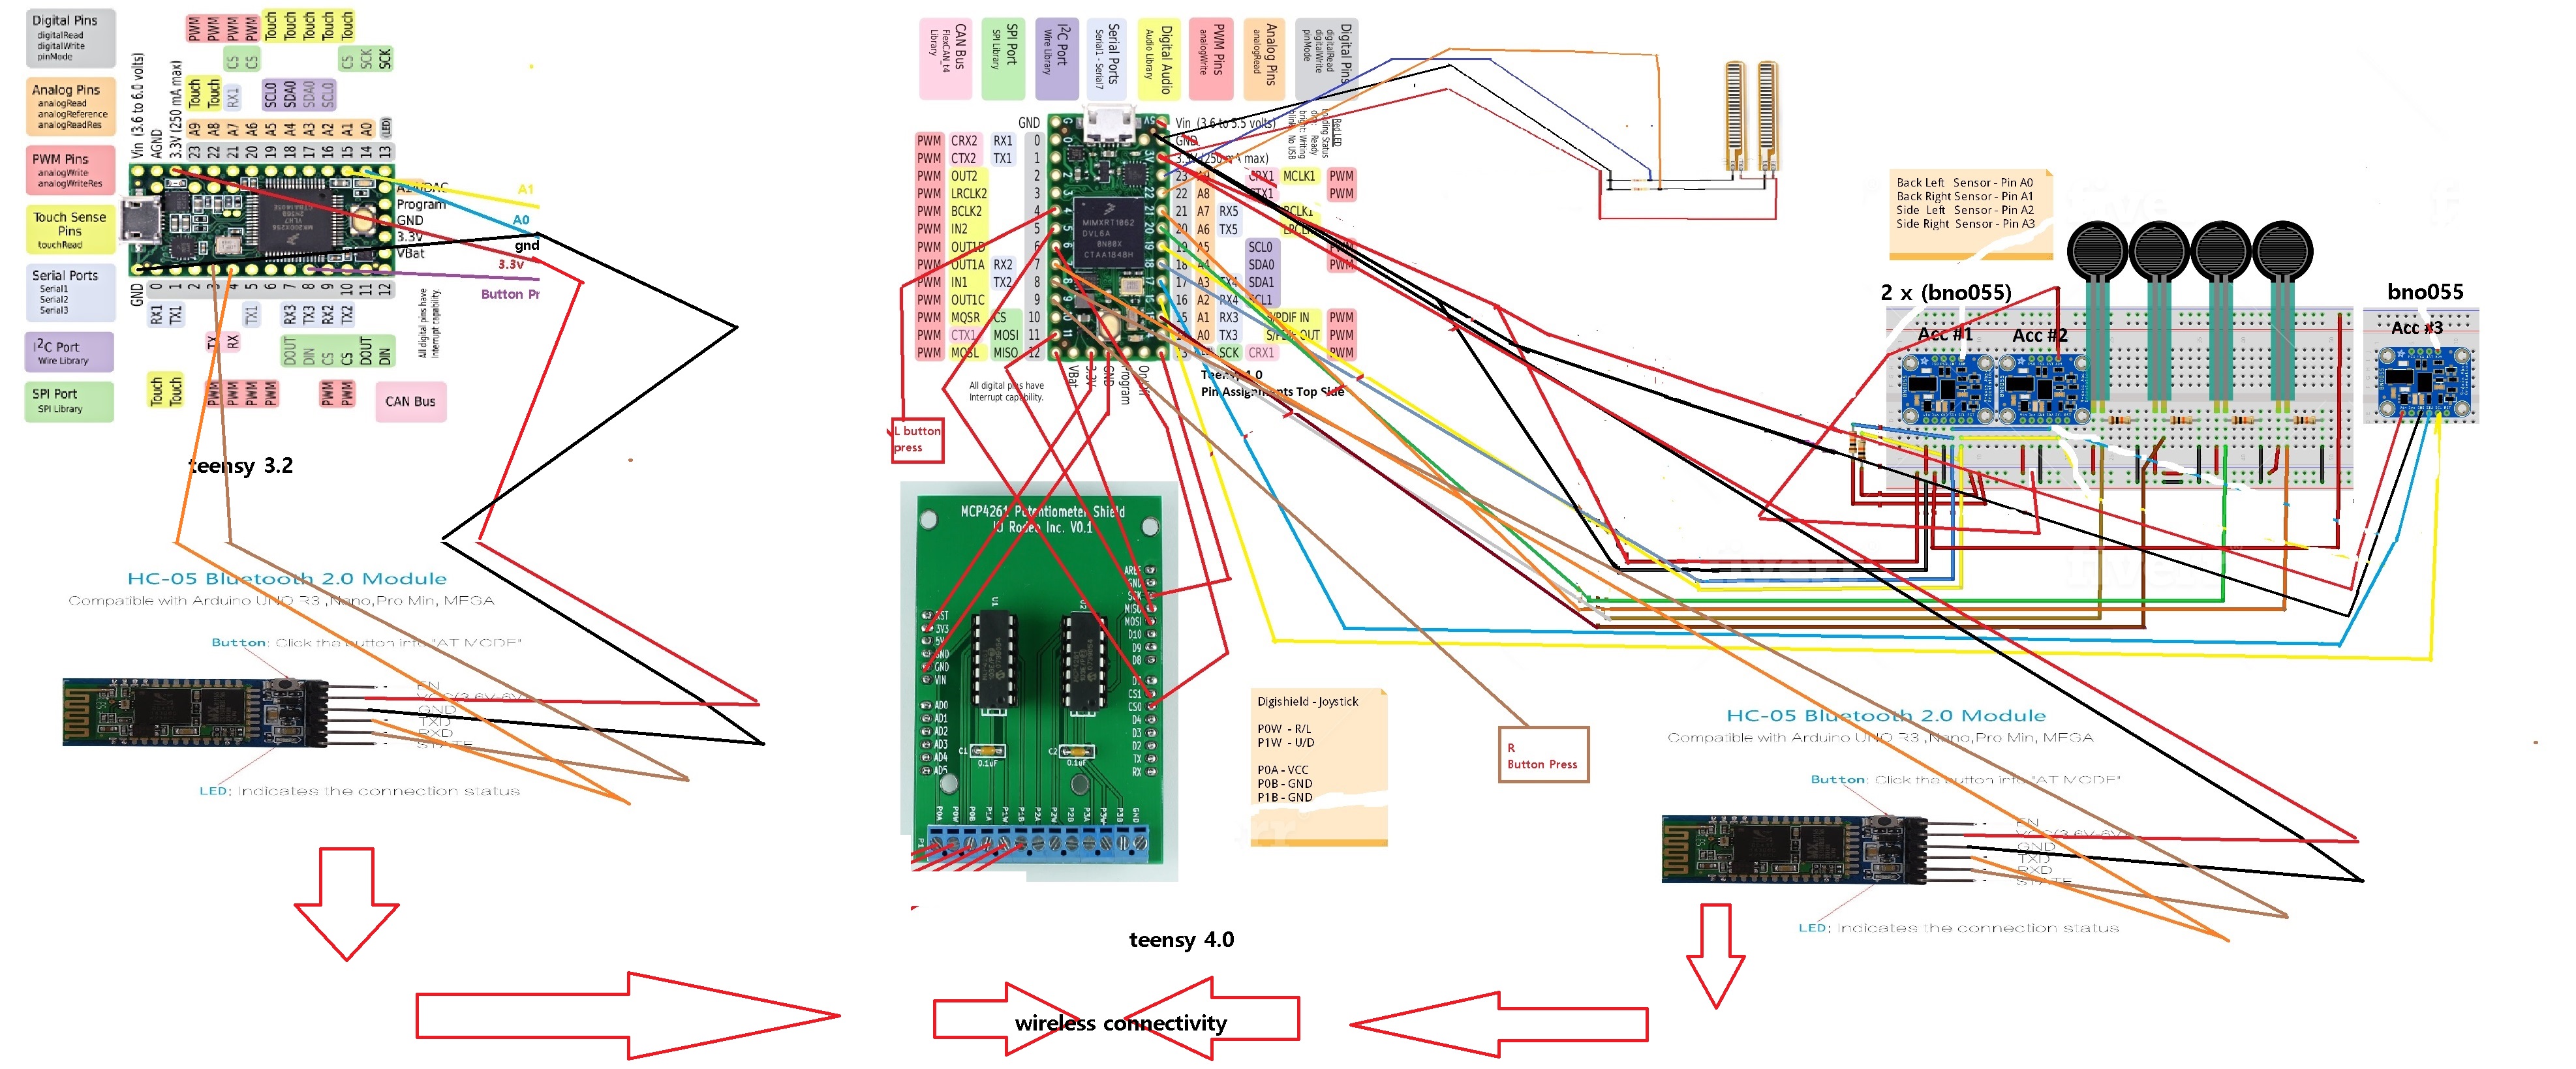
- The teensy 3.2 communicates to the PC via a wireless minirouter using the method below
Addeded below quick text tutorial on how to make Hardlight VR suit Wireless: Physical equipment needed Mini USB Powered Router: http://a.co/d/5nOLFPu Battery Pack: (any battery pack with 1 USB for mini router, and 1 AC plug for suit will work) http://a.co/d/3rWK5fU You may want a shorter USB Cable like this one: http://a.co/d/buARn6Y Velcro straps, pouch or some method of attaching the battery pack, mini router and cables to the HardLight Suit Install and test the Hardlight VR suit via wired to confirm everything is working. Software needed Download VirtualHere “Server” https://www.virtualhere.com/sites/def… This is the image you will be installing on the mini router Download VirtualHere “Client” (this is for the 64bit version of Windows) and install it https://www.virtualhere.com/sites/def… Setup Mini Router: (please familiarize yourself with the mini router docs that came with the mini router, or are available here: https://static.gl-inet.com/www/upload… Proceedure Plug in and power up mini router Connect to the mini router via Wi-Fi or LAN For Wi-Fi: Find Wi-Fi with SSID “GL-XXXXX-xxx” Password is goodlife (SSID and password also on bottom of router) For LAN: Just plug into LAN Port on Router Once connected to mini router Connect to http://192.168.8.1 with browser to setup router Update the firmware on mini router by going to Firmware then Upload Firmware Navigate to where you downloaded the VirtualHere “Server” image and install it (Next are excerpts from this site: https://www.virtualhere.com/hardware) The device will reboot and a WiFi network called CloudHub_xxxxxx (where xxxxxx is a unique number) will appear Join the network with your WiFi card on your client pc. (Default wifi password is: cloudhub66 ) Start the VirtualHere client and the CloudHub will automatically appear listed after 15-30 sec Plug the Hardlight Suit into the USB port on the mini router, making sure the Hardlight Suit has power (either battery pack or wall) It should show up in the VirtualHere Client You can now test the Hardlight Suit before proceeding, right click the HardLight Icon in the notifications area and select “Test Everything” Once the operation is confirmed, it’s time to put the mini router USB server on local Wi-Fi In the VirtualHere Client, right click on “CloudHub xxxxx” and select “Properties” Change the, “I want this CloudHub to be:” from “standalone” to “part of an existing network” Enter your local Wi-Fi credentials The Hardlight Suit should now show up in the VirtualHere Client when you are on your local network, wireless or wired. References: http://www.hardlightvr.com/setup/ https://www.gl-inet.com/products/gl-m… https://static.gl-inet.com/www/upload… https://www.virtualhere.com/hardware https://www.virtualhere.com/usb_clien…

2 Likes
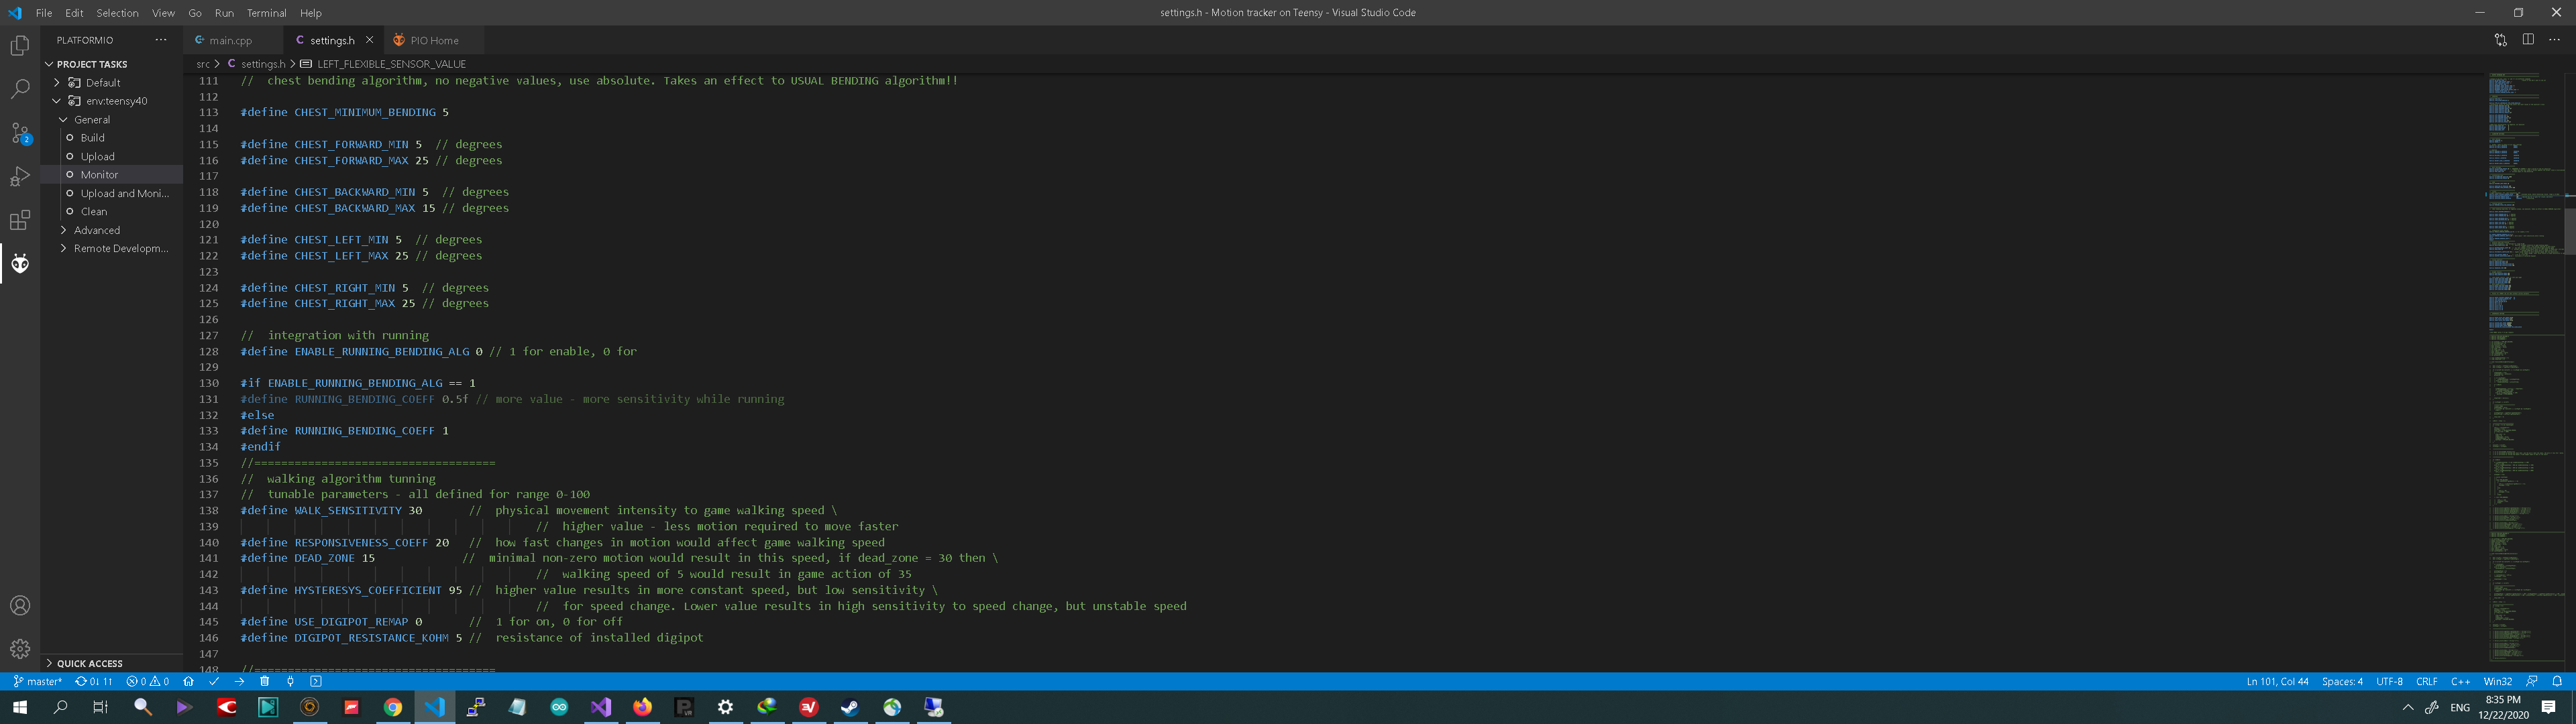
Some screenshots of the options available for button setting/use in the openvr driver for the locomotion system:

Some screenshots of settings/options for the locomotion system , sensors and functionality


1 Like
Openvr driver testing for wireless connectivity of the arduino based locomotion system to steamvr

1 Like
This is looking better and better all the time. The strafe/back walk looks like it responds better than NaLo. It looks like the steps are done when the heel is raised and not when completing a step though. Is this done to combat room scale movement?
1 Like
Hi! the step happens when moving the foot. Not sue I understand what you mean, but any delay or else, might be due to mismatch between the video shoot with the cell phone and the video of the gameplay recorded with the pc, not being perfectly synchronized, and that is easier from your eyes to catch it for the feet movements rather than with the chest movements.
There are several settings in the code to set the sensitivity of the walk and run based on our preferences
I prefer a walk that does not make me lift the legs too much up.
Also I am testing the cruise option. Did u notice it ? I keep 1 foot in a position for X ms (that we can set up in the code), and then I can control the avatar analog speed with 1 foot depending how much I bend the foot.
Do you see the difference between cruise control and walk/run control?
I am also looking into a next phase of building a sort of non-motorized omnidirectional mat, so that I could actually walk or run over it, rather than step in place. Not sure I will ever be able to make it done. Also it would need to be of the dimension of my play area.
I have found these sources for ideas:

https://cdn.discordapp.com/attachments/668905976463622173/793955975395672085/560800a382-2.pdf
Any suggestions please?
Also, could you please rephrase and explain to me better what you see in the walk/steps I do and system behaviour? It helps me.
I truly hope being open source this project, after I post the tutorial, other people would contribute to improve the system and adding options or more sensors or else.
@Heliosurge was suggesting I could maybe offer already assembled systems for who would not like to assemble a system like this himself/herself alone. The issue is that it is too expensive to get a few of these assembled and this is still a custom (DIY) project that would not economically (and with no service/support offered) comparable to what commercial locomotion systems offer, despite this DIY system could be even better or not worse (on the same level) than the commercial offers.
In January I am looking to pay a person I know to solder the microcontrollers and all the connections, on a protoboard with also plugs to which I would connect the wires from and to the different sensors. That way, would look even much more neater. Right now It is in a raw status. I am keeping the “main board/s” wires/connections, into the belt strap. From the belt, there is:
– 1 cable running on the right leg to the right shoe (and there is at the right knee level the bending sensor to activate crouch)
– 1 cable running on the left leg to the left shoe (and there is at the left knee level the bending sensor to activate crouch)
–1 cable running on my back, to the “chest” sensor. I prefer to mount that sensor at my back, rather than at my chest
1 Like
At the 3:00 mark you hold up each heel individually, and while holding up this results in a few steps. So it isn’t using a completed step as a ‘nudge’ to the analog stick.
This must be what I am referring to, not a fan of this though.
Yeah, setting up a diy omnimill that also allows you to still freely move around(while not putting yourself in danger ![]() ) is difficult/expensive. IIRC, this is what you are trying to accomplish correct? I’ve seen a system that had a set of motorized perimeter belts that used a camera to detect when to activate. For me I’d be satisfied with a ‘dish’ type omni mill that doesn’t take up a lot of room. The Kat Walk C looked promising, but for a ‘dummy’ platform it seemed overpriced still.
) is difficult/expensive. IIRC, this is what you are trying to accomplish correct? I’ve seen a system that had a set of motorized perimeter belts that used a camera to detect when to activate. For me I’d be satisfied with a ‘dish’ type omni mill that doesn’t take up a lot of room. The Kat Walk C looked promising, but for a ‘dummy’ platform it seemed overpriced still.
2 Likes
I think if you could get the ‘chest sensor’ as the central brain that has all the essential parts on to a custom pcb with ports to allow for additional sensors with or without a case(option to 3D print), that is also customizable, it could be a ‘marketable’ product. I think the customization could use a user friendly GUI, as I don’t feel most people are comfortable modifying .ino files unless there are very detailed guides.
1 Like
That is the cruise option. If you get tired, you move the avatar at analog speed using 1 foot only. You activate it by holding the foot in that position for x milliseconds and then the more or less the angle you make with the foot, the faster or slower the avatar moves. I do not think katloco offers analog speed for cruise (for example) ? You can also use the chest accelerometer at the same time, to give the direction of the movement.
yes it is what u are referring to.
It can be disabled ![]()
This is the good thing of opensource DIY system. You make it the way you want it. You have control of everything. It only depends how skilled we are to add crazy things to it, or simply remove options easily…
Not sure what IIRC means.
I am looking into a non - motorized version though.
As per Walk C , I have received mine (I backed it) but it is in storage. The shoes are meant to still slide though. Not real walk.
It might be doable to make the base of the kat C
I have found this ![]()

How familiar is this to Kat C base LOL
Might be possible to 3d print such sort of base as the katc.
I am personally dream to make somehow a rotating floor as the infinadeck/omnidirectional treadmill. But probably impossible. Need to hire a mechanical engineer and who know the price to get it done…
Also, maybe not motorized, means I would make it rotate by walking on it , if even possible. Even more complicated with motors. Can’t do that for sure
1 Like
On January I am having someone about what u juts said. But the problem is that it is too expensive to produce 1 or just a few of these…
The costs go down if you produce in mass/bulk the pcb and buy in mass the sensors, etc.
Not costly effective otherwise if there is no demand for it.
It would then cost more than the katloco or walkovr to make 1, 2 or 3 etc.
For the GUI, that is/was on the to-do list already. But it will take months since the developer that is working on the project for me is busy with his new job.
1 Like
Must say I’m of the opinion that even without motors, an otherwise unpowered treadmill device would at least need proportional braking, or it’s just another slidemill.
1 Like
Yeah I see what you are saying, I have done some paid side jobs that required me to purchase material that eliminated most of the profit and left unused material. It’s hard to justify putting up money that you might not recoup. It’s also difficult to get interest for an unfinished project though. For prototyping there’s an expected loss to get the first unit to a finished state.
1 Like
Abbreviation meaning If I Recall Correctly (Had to look it up myself awhile ago)
This is quite true. The idea of offering to sell an assembled unit in this case would be more for opening up development. OSVR was also very expensive however the idea was to help others make there own vr headset using a frame and the components you wanted to add.
With this idea is not to go full commercial release but more to help with interest. For example you might have someone whom might be good with code but not interested in assembling the components.
@g-coded is referring to simply making the brain box and folks in that regard can build there own nodes for the sensors. From my understanding.
2 Likes